Friday, 22 April 2016

*7 Week Plan of Prototype

For this 7th week, i plan to talk about the prototype of my Air Quality Monitoring System. The characteristic of the prototype :
  • Small
  • Air holes
  • Portable
  • Long lasting
  • Mild
  • Interesting color

This is one of the example of suitable casing for my AQMS :


The "Frame" design case with an integrated heatsink
From fischer elektronik


Saturday, 16 April 2016

*6th Week Component Confirmation

For 6th week, i had confirm with my SV about the component that i will used for made up my Air Quality Monitoring System.

#Optical Dust Sensor (Input)
#Temprature & Humidity Sensor (Input)
#Arduino (Process)
#Light Emitting Diode, LED (Output)
#LCD (Output)

For Arduino, i had to decide which one is better to process my system. Between Arduino Uno and Arduino Ethernet Shield OR Arduino Yun. The characteristics that i had to compare is the cost, the pin that use and others.

In this week, my SV shows the example of Arduino operation by using a Dust Sensor.
This is one example the Dust Sensor and Arduino usage : http://sensorapp.net/sharp-dust-sensor-and-arduino/

Beside that, for this week, i had submit my repaired proposal.

Thank You :D

Friday, 15 April 2016

*8 Air Mentor

Air mentor is one the device that monitor the indoor air quality. This device have same function with my Air Quality Monitoring System which is to monitor the air quality, but only inside the building.

AIR MENTOR

Air Mentor is an intelligent air quality monitoring device. With built-in industrial grade sensors, it can stably monitor air pollutants including Particulate Matters, Total Volatile Organic Compounds and CO, CO2, together with environment temperature and relative humidity.


There is two product of Air Mentor :
1. Air Mentor - Smart Air Quality Monitor
Air Mentor is smart Air Quality Monitor. It can detect concentrations of VOC, Particulate Matter, Temperature, and Relative Humidity.

2. Air Mentor PRO - 6 in 1 Smart Air Quality Monitor
Air Mentor in an intelligent Air Quality Monitor up to 6 in 1 indoor pollutant concentrations of CO2, VOC together woth CO,PM2.5 and PM10, Temperature, and Relative Humidity.


This is the video of Air Mentor :


#Check current air quality by APP
When connecting to the sensor, Air Mentor APP can show real time individual masurements and it gives advising for improving the air quality. Our purpose is to provide an easier tool to make your indoor quality simplify. We also provide iOS and Android to display tips and suggestions of detections results.

#Easy tracking with APP
Air Mentor sensor can record 3 days measurements, when Smartphone closes to the sensor and the APP will connect to it and download recording data automatically. User can check the air quality changes by hourly, daily, weekly and monthly, and can also mark notes into the chart for long term tracking and improvement. 


The Design
Overall structure fits snugly and yoga style. The combination of LED light shows th air quality on each level with different color and breathing frequency.

Air Mentor Appplications in School :

 For more detail about this product, please go to : https://www.air-mentor.com/products

Thursday, 14 April 2016

*5 The Repaired Proposal

For the fifth week, i had check my proposal. There is a lot of things that i have to repaired to improve my proposal.

#Project Briefing

*Temperature sensor & Humidity Sensor
My SV asked to add this sensor at the input of my project. There is an example of Temperature & Humidity Sensor.


DHT22 TEMPERATURE-HUMIDITY SENSOR

The DHT22 is a basic, low-cost digital temperature and humidity sensor. It uses a capacitive humidity sensor and a thermistor to measure the surrounding air, and spits out a digital signal on the data pin (no analog input pins needed). Its fairly simple to use, but requires careful timing to grab data. The only real downside of this sensor is you can only get new data from it once every two second, so when using out library, sensor readings can be up to 2 seconds old.
Simply connect the first pin on the left to 3-5V power, the second pin to your data input pin and the right most pin to ground. Although it uses a single-wire to send data it is not Dallas One Wire compatible! If you want multiple sensors, each one must have its own data pin! This sensor is more precise, more accurate, and works in a bigger range of temperatur/humidity, but its larger. Comes with a 4.7K-10K resistor, which you will want to use a pull up from the data pin to VCC.

Technical Details :
  • Low cost
  • 3 to 5V power and I/O
  • 2.5mA max current use during conversion (while requesting data)
  • Good for 0-100% humidity readings with 2-5% accuracy
  • Good for -40 to 80C temperature readings ±0.5°C accuracy
  • No more than 0.5Hz sampling rate (once every 2 sec)
  • Body size 27mm x 59mm x 13.5mm (1.05" x 2.32" x 0.53")
  • 4 pins, 0.1" spacing
  • Weight 2.4g

The datasheet: DHT22 datasheet

So, my block diagram has been change :

#Problem Statement

The Real-Time data
The data about the quality of air from the Meteorological Department might be late a few hours before the peolple receive the information. This is because the department has to take a time range within 24hours.

The Location
The information from th news might be at the big cities, but not at the actual area that the people require. So, the user can used this device to their specific area.

The Accessibility of Data
The user can get the information anytime and anywhere. As long as the user is connected to the internet. So there is no problem for user to know the current air at the their home while they are away.

The Flexibility
This device is portable, the user can use this device wherever they want, so they can make sure that the air at their current place is safe.


#Objectives
  1. To study about the air quality monitoring system
  2. To run the simulation of the system
  3. To assemble the hardware prototype with all the sensor
  4. To develop the functionality using Arduino
  5. To testing and checking the operational of this system
  6. To analyse the performance of this system

#Workscope
  1. This air quality monitoring system can be used either inside or outside the building, as long as the device not exposed to the wet surface
  2. The device must be connected to a Wifi network
  3. Th user must have internet connection to display the data

#The Methodology
  1. Project Planning
  2. Study about the air (poor air)
  3. Determine the hardware and software
  4. Determine the connection and do simulation
  5. Implementation of the hardware and software
  6. Troubleshoot and Testing
  7. Data analysis and Report

#Result Expectation
  1. A working prototype of an air quality monitoring system
  2. The device gives accurate and real-time information about the level of the air quality to user
  3. The device gives information about the level of air quality to user anytime and everywhere


This all the things that i had repaired for my proposal for this PSM1. i hope there nothing that have to be repair anymore :D

Friday, 18 March 2016

*4 The Proposal

For this week, we were asked to submit the first proposal of our project. This proposal is to propose to Supervisor, what we plan of our project. There is a things that require in the proposal.
*This proposal was did not approve by Supervisor yet.


#Project Briefing
For this part i had explain about my project. What the advantage, the operation and the device that i will used.

Air quality monitoring system is a system that created to monitor the level of air quality at the specific area. The main purpose of this system is to give the information of air quality to people. People will decide wherever they want to place this device and get the information from the LCD Display or through any device that connected to the internet. So the information from this system is the most accurate and fastest way. Besides that, people can get the information, anytime and everywhere.
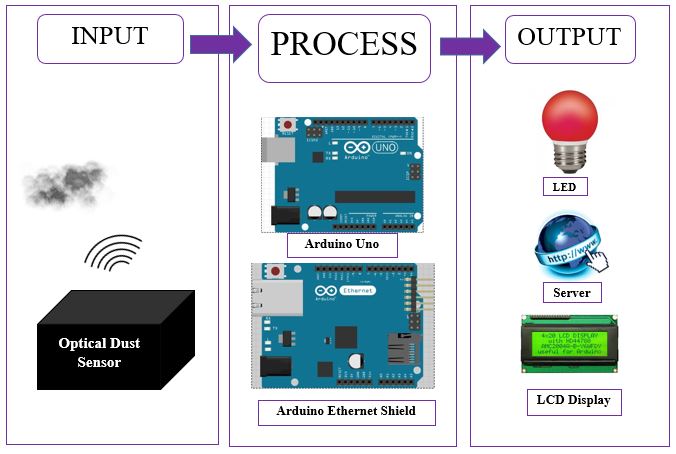
The main stuff to operate this system is Dust Sensor, Arduino Uno, Arduino Ethernet Shield, LCD display and Internet. For software are Arduino, Fritzing and Proteus. The operation is start from the Dust sensor, it will sense the air pollution, and then the data is transfer to Arduino Uno. The Arduino will recognize the data, and translate it into the human language through the Arduino software. Next, the data will send to the Arduino Ethernet Shield and LCD Display. Then, through the Arduino Ethernet Shield, people can get the information by connect to the internet.


#Problem Statement
This part, i had explain the problem that will be solve by my project.

Air quality monitoring system device is used to dtct the level of aie pollution and give the information to user. Nowadays, the air in our country is full of dust and smoke. This poor air continues and there is no solution. This is because of many sources, such as vehicles emissions, smoke from factories and open burning. This situation even worse and causing haze. It will cause people exposed to the bad health in this poor air.
To help people from exposed to this poor weather, this air quality monitoring system will act as a warning device by give the information about the air quality to user. By this information, it will assist user to avoid being at the poor air, or wearing a mask.


#Project Objective
There is a objective that i have to achieve by completing this project.
  • To study about the air quality monitoring system.
  • To develop the software that used to complete this system.
  • To create the device that will monitor the quality of air.
  • To give the most accurate, fastest information about the air quality to people.
  • To analyze the performance of this system.


#Project Work scope
Work scope is a limitation of the project work or where the device can used and so on.

This air quality monitoring system project can be use either inside or outside the building. As long as the device did not exposed to the wet surface, because it is not a waterproof device. For the place outside the building, the device needs to cover up with something that act as roof, to protect device from the rain or other harassment. Next, there is no limitation of the distance between the user and device, because to get the information, except for LCD Display, user can get the information by surfing internet.


#Project Methodology
There is a flowchart of my work plan to completing this project.


#Result Expectation
This is my expectation from this project.

  1. A working prototype of an air quality monitoring system.
  2. A complete device of air quality monitoring system.
  3. The useful device to user.
  4. The device gives accurate and faster information about the level of the air quality to user.
  5. The device gives information about the level of air quality to user anytime and everywhere.


This proposal have been submitted to supervisor, if there any mistake, I will


Thursday, 17 March 2016

*3 The Operation

#The new block diagram for AQMS

There is a updated block diagram of my project.


As the block digram show above, i had add LED at the output of my project.


*3 The Device

#Optical Dust Sensor


Sharp's GP2Y101AU0F ia an optical air quality sensor, designed to sense dust particles. An infrared emitting diode and a phototransistor are diagonally arranged into this device, to allow it to detect the reflectd light of dust in air. It is especially effective in detecting very fine particles like cigarette smoke, and is commonly used in air purfier systems.

The sensor has very low current consumption(20mA max, 11mA typical), and can be powered with up to 7VDC. The output of the sensor is an analog voltage proportional tu be measured dust density, with a sensitivity of 0.5V/0.1mg/m3.
To interface with the sensor you need to connect to its 6-pin and 1.5mm pitch
 connector. Meanwhile this is the example of the operation that used this type of dust sensor : 


#Arduino Uno

Arduino is an open source physical computing platform based on simple i/o board and a development environment that implements the Processing/Wiring language. Arduino can be used to develop stand alone interactive object or can be connected to software on your computer (e.g. Flash, Processing, MaxMSP). The open source IDE can be downloaded .
The Arduino Uno is a mirocontroller board based on the Atmega328. It has 14 digital input/output pins (of which can be used as PWM outputs), 6 analog inputs, a 16Mhz crystal oscillator, a USB connection, a power jack, an ICSP header, and a reset button.
It contains everything needed to support the microcontroller, simply connect it to a computer with a USB cable or power it with a AC to DC adapter or battery to get started.
The Uno differ from all preceding boards in that it does not use the FTDI USB-to-serial driver chip.

Features:
  • Microcontroller                      ATmega328
  • Operating Value                     5V
  • Input Voltage                         7-12V
  • Input Voltage(Limit)             6-20V
  • Digital I/O Pins                     14 (6 provide PWM Output)
  • Analog Input Pins                  6
  • DC Current per I/O Pin         40mA
  • DC Current for 3.3V Pin       50mA
  • Clock Speed                          16MHz


#Arduino Ethernet Shield

The Arduino Ethernet Shield allows an Arduino board to connect to the internet. It is based on the Wiznet W5100 ethernet chip. The Wiznet W5100 provides a network (IP) stack capable of both TCP and UDP. It supports up to four simultaneous socket connections. Use the Ethernet library to write sketches which connect to the internet using the shield.
This is the Tutorial of Room Monitoring Web Server :


All the device that i mention above is the main device that i will used to build up my Air Quality Monitoring System. This 3 device will work at the input and process of AQMS operation. But, i might be change the type of Arduino, because there is another type of Arduino that provide the connection of internet. Which is i just have to use one Arduino for my project. The type of that Arduino is, Arduino Yun.


#Arduino Yun
Arduino Yun is the perfect board to use when designing connected devices and, more in general, Internet of things projects. It combine the power of Linux with the ease of use of Arduino.

Features :
  • Microcontroller                         ATmega32U4
  • Operating Voltage                    5V
  • Input Voltage                            5
  • Digital I/O                                20
  • PWM Channels                        7
  • Analog Input Pins                    12
  • DC Current per I/O Pin            40mA
  • DC Current for 3.3V Pin          50mA
  • Clock Speed                             16MHz


There is a device that i will use as a output receiver for this AQMS. All this device will act as a warning sign to the user. This device might be change, all depend on the situation or suitability.


#LCD Display
This LCD Display will place at the device. Which is the user will see the information of air quality directly on the device. This LCD display will always show the current level of air quality. This LCD display will share the same input from Arduino with LED.


#Light Emitting Diode
Colured LED Bulb


This LED bulb will function followed the level of air quality.
At the Good level, the green LED will light up, to notify the user that the current air is very good. For the next stage,  which is Moderate, the Yellow LED will ON. Then for the  three last stage, dangerous, red LED will ON. At this stage, i think, i want to add a device, like alarm, so that the alarm will warn the user about this poor air.

Now, i was thinking to add something at the output of this project, which is at the LCD Display. I also plan to add an alarm . But it depends on the compatiblity. All this plan, i will refer to my Supervisor.

The Level
LED
LCD Display
Alarm
Good
Green,
The API is _____
“The Air is Good”
OFF
Moderate
Yellow
The API is _____
“The Air is Not Good, Please wear a mask”
OFF
Dangerous
Red, Blinking
The API is _____
“The Air is Dangerous, Please wear a mask”
ON